3. Mailchimp to Salesforce Integration - Campaign Sync
IMPORTANT UPDATE:
As of June 2024, we learned Mailchimp delisted their AppExchange package - BUT you are still able to download the free app if you have the link. In its place is a new paid app branded as the "OFFICIAL MAILCHIMP SALESFORCE INTEGRATION". This article is about the old free app from Mailchimp, not the new paid app. Also, be advised that any enhancements, flows, custom fields, etc that you add to the objects in the free app will not 'transfer' over to the new paid app. The paid app uses all new custom objects and everything will have to rebuilt on these objects. Check out Blu Tiger Academy for the latest information we have on the apps.
Business Problem

Mailchimp is a great tool for people who are just starting out with email marketing and they currently use Salesforce as their CRM. We have done several implementations of Mailchimp and Salesforce and wanted to provide you with our best practice approach of how to set it up right the first time.
This is Part 3 of how to setup the Mailchimp to Salesforce integration where we will show you how to solve the following business challenge we ran into while implementing Mailchimp for Salesforce. Check out our Mailchimp How To section for additional tips on how to extend this integration.
- Metrics for Mailchimp Campaigns are separate from other Salesforce Campaign metrics - The Mailchimp package comes with a custom object called MC Campaigns which holds the metrics you want to report on. If all of your other campaign data is in the standard Salesforce Campaign object, reporting is cumbersome. Plus, what if you move to another marketing automation tool? All of your metrics are in the Mailchimp package - if you uninstall the package from Salesforce all of your metrics will be gone as well.
- Automate Salesforce Campaign creation - This how to will also show you how to automate the creation of a Salesforce campaign from an MC Campaign. If you start with a Salesforce Campaign and then sync the campaign members to Mailchimp, don't worry this process will not create duplicates, it will just keep the stats up to date.
Or continue on for a short tutorial below.
Note: The video tutorial goes way more in depth.
How to Instructions
Update Salesforce Campaign Metrics from MC Campaign
- We have two objectives to accomplish here:
- Create a Salesforce Campaign that is connected to the MC Campaign record if one does not exist.
- Update metrics on the Salesforce Campaign with the data from the MC Campaign object.
Follow these steps for how to complete this process:
- Create the following fields in Salesforce on the standard Salesforce Campaign object:
- MC Campaign - lookup field that looks up to the MC Campaign record
- Emails Sent - number field no decimals
- Opens - number field no decimals
- Unique Opens - number field no decimals
- Clicks - number field no decimals
- Unique Clicks - number field no decimals
- Unsubscribes - number field no decimals
- Soft Bounces - number field no decimals
- Hard Bounces - number field no decimals
- Abuse Reports - number field no decimals
- Forwards - number field no decimals
- Forwards Opens - number field no decimals
Now you may be asking yourself, why aren't we creating formula fields here since we have a link between the Campaign and MC Campaign objects. There are several reasons:
- The data is not being stored on the Campaign object, it is referencing the data on the MC Campaign object. If we uninstall the Mailchimp package, then all of this data would be lost.
- If you were using another email automation tool and needed to migrate your data over, you would have your email metrics in two different fields for the same metric.
- We may want to update the fields at some point and if they are formulas we will lose that ability.
For ease of reporting, we recommend creating the following formula fields on the Campaign - you will then be able to see averages across all email campaigns and show these in a dashboard:
-
- % Opens - formula = # Opens/Emails Sent
- % Unique Opens - formula = # Unique Opens/Emails Sent
- % Clicks - formula = # Clicks/Email Sent
- % Unique Clicks - formula = # Unique Clicks/Email Sent
- % Unsubscribes - formula = # Unsubscribes/Emails Sent
- % Hard Bounces - formula = # Hard Bounces/Emails Sent
- % Soft Bounces - formula = # Soft Bounces/Emails Sent
Use the IF function in your formulas to prevent the #Error! value when the Emails Sent = 0 like this:
IF( Emails_Sent__c = 0, 0, Opens__c / Emails_Sent__c )
- Next, we will create a flow that will create and update the standard Salesforce Campaign from the MC Campaign record.
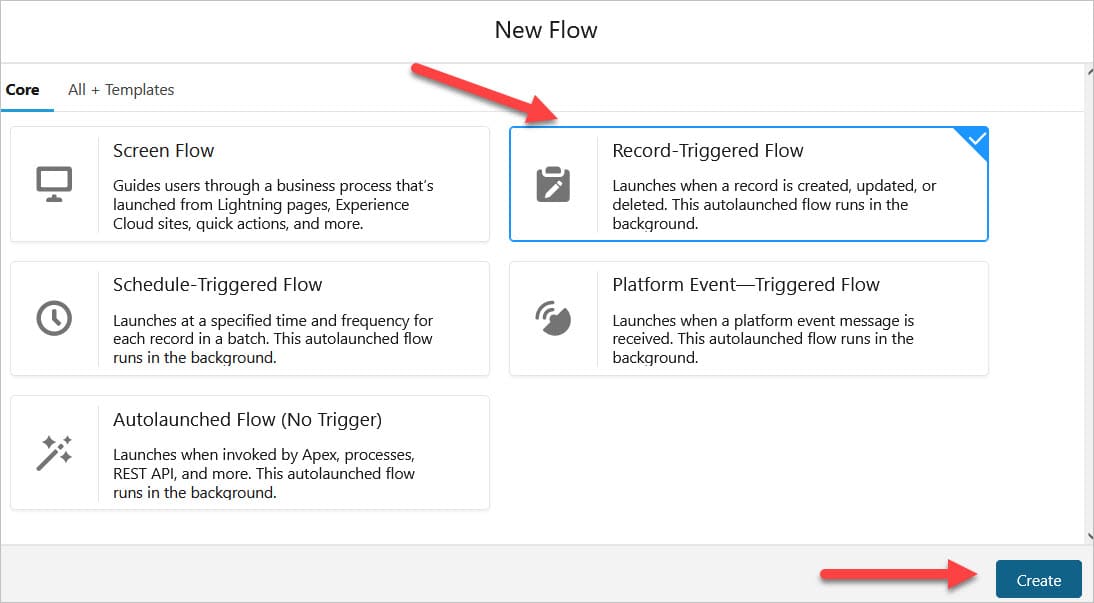
- Go to Setup -> New Flow

- Select Record-Triggered Flow -> Create
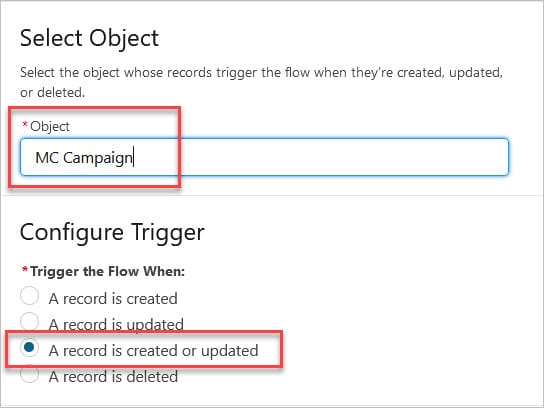
- Object = MC Campaign
- Configure Trigger = A record is created or updated
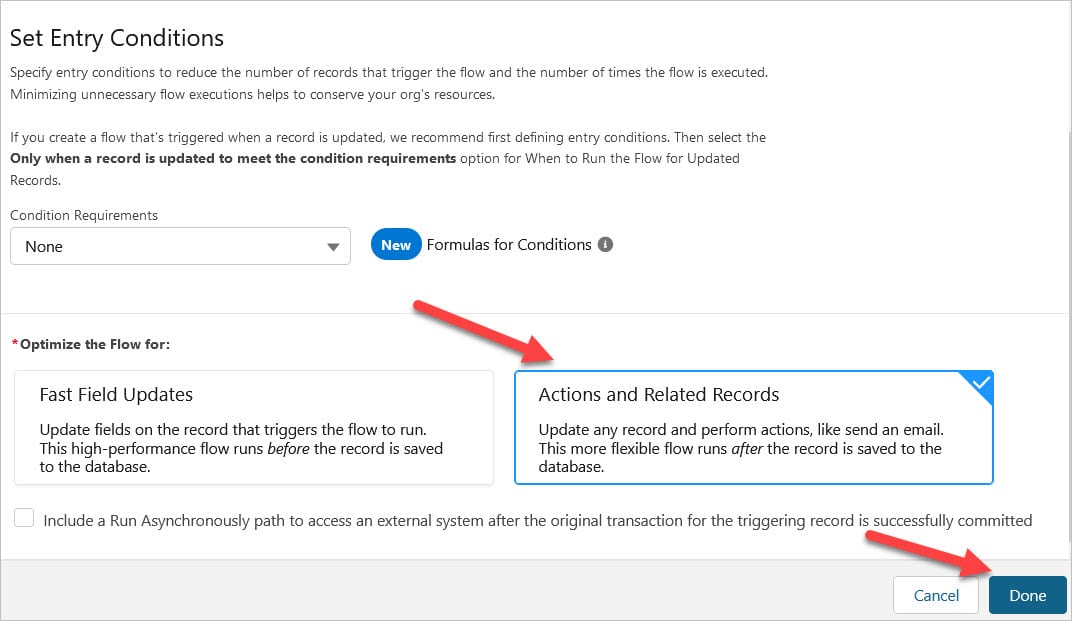
- Make sure the Actions and Related Records is selected
- Click Done
- Click + sign to add element
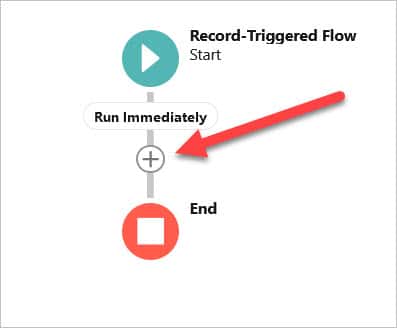
- Select Get Records
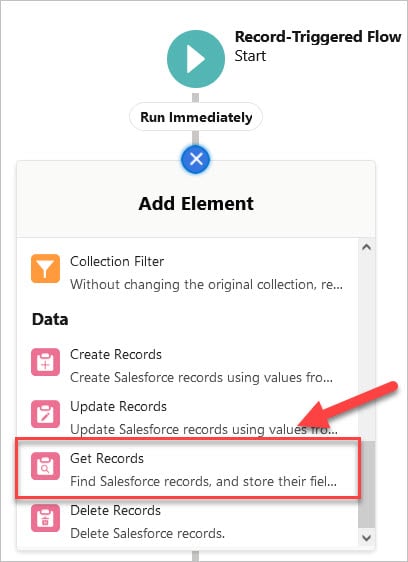
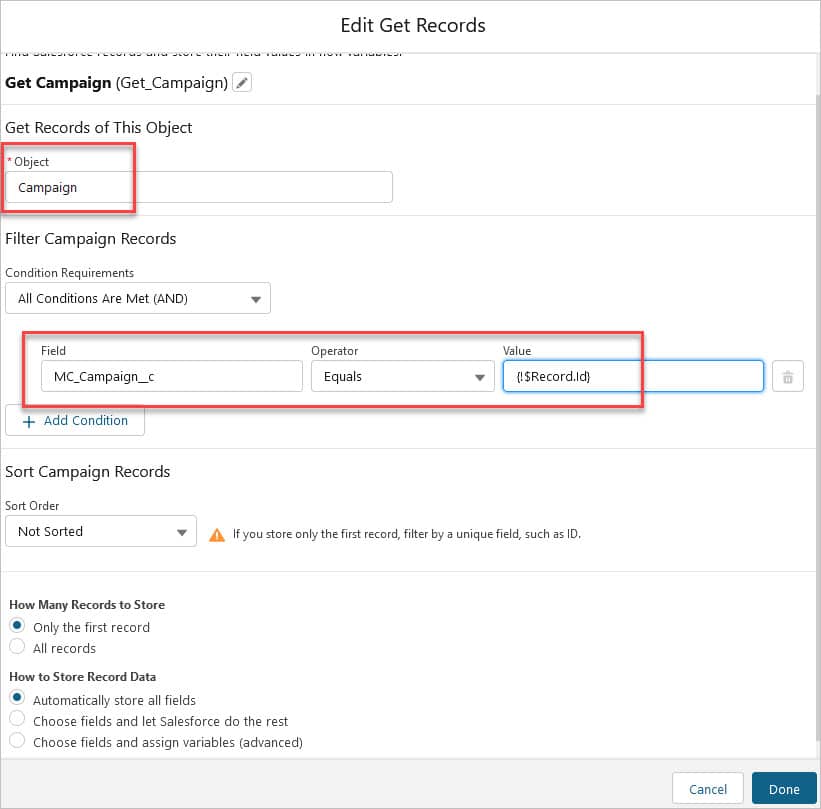
Now we need to configure the Get Records element to look for an already existing Campaign record. If one already exists, we do not want to create another one.
Configure the Get Records element:
- Label = Get Campaign
- Object = Campaign
- Filter Campaign Records:
- MC_Campaign__c Equals {!$Record.Id}
- How Many Records to Store = Only the first record
- How to Store record Data = Automatically store all fields
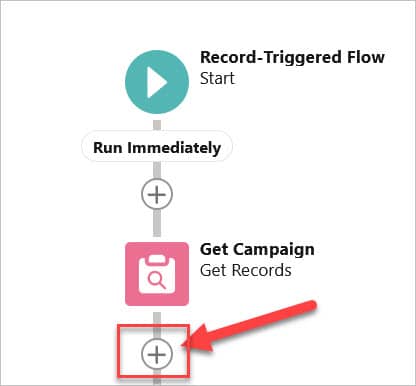
- Click + sign below the Get Campaign element to add a new element.
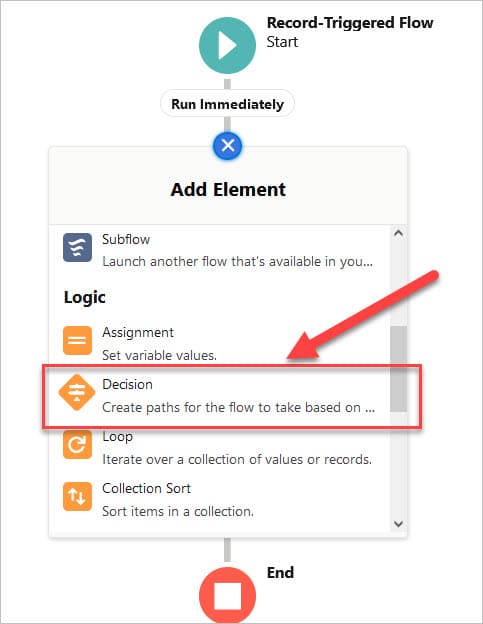
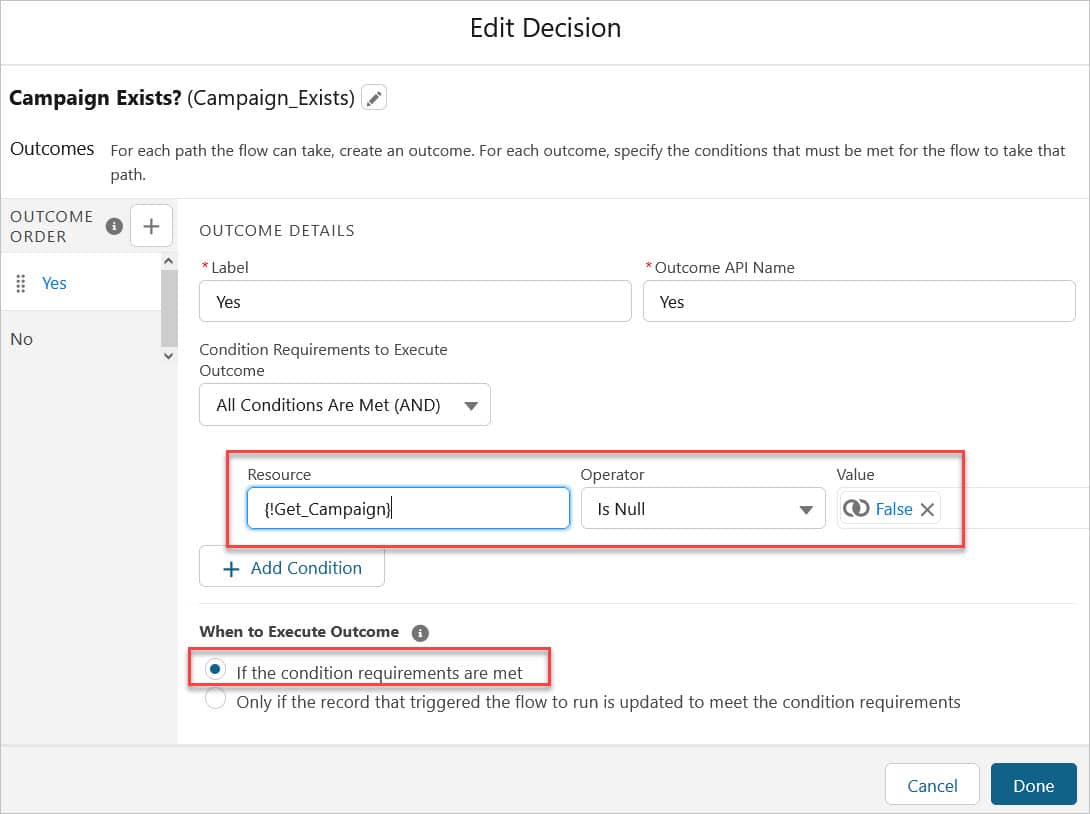
- Select Decision
- Configure the Outcome:
- Label = Yes
- Condition: {!Get_Campaign} Is Null = False
- When to Execute Outcome = If the condition requirements are met
- Change the label of the Default Outcome to No
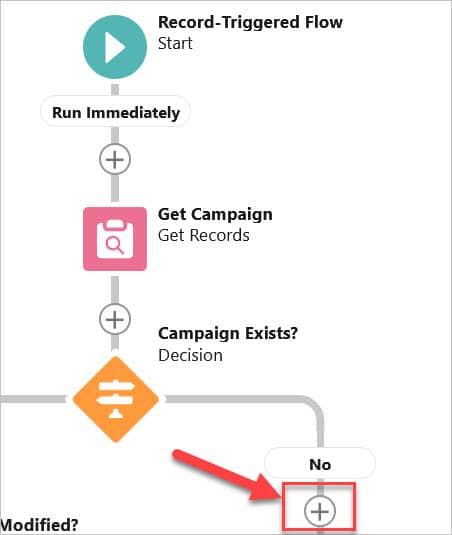
- Click + sign below the No path to add a new element
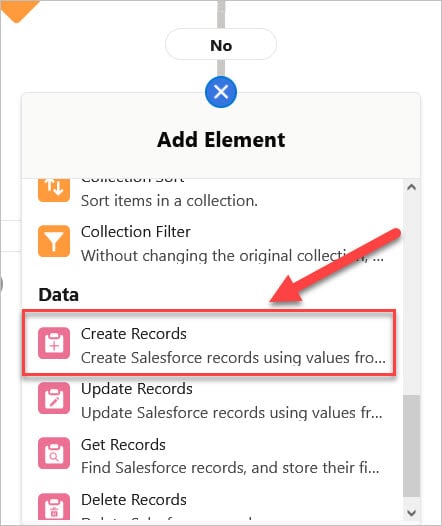
- Select Create Records
-
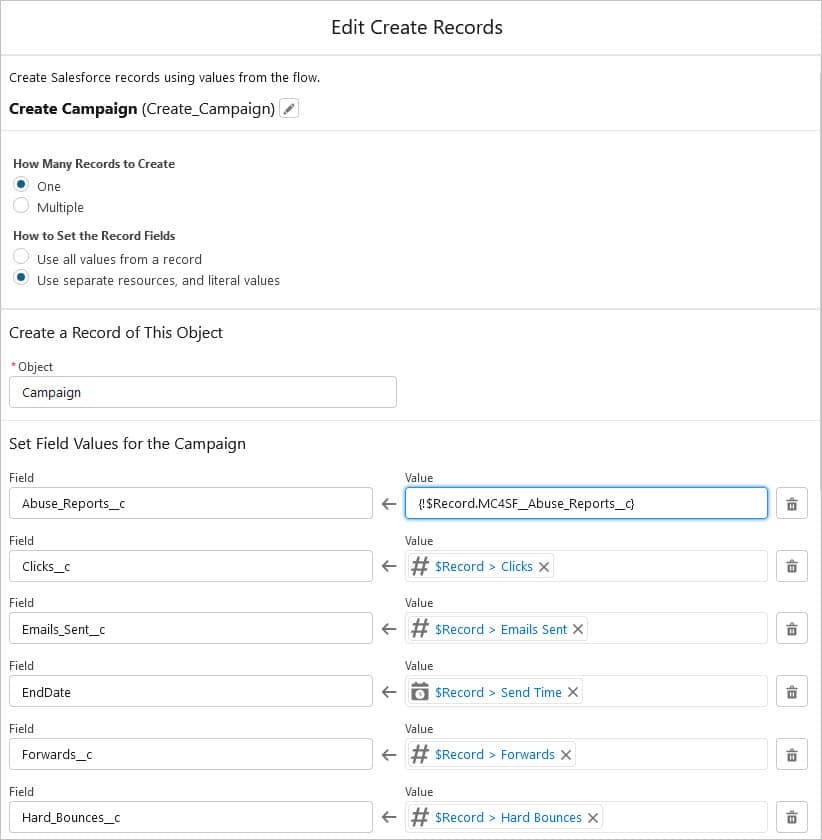
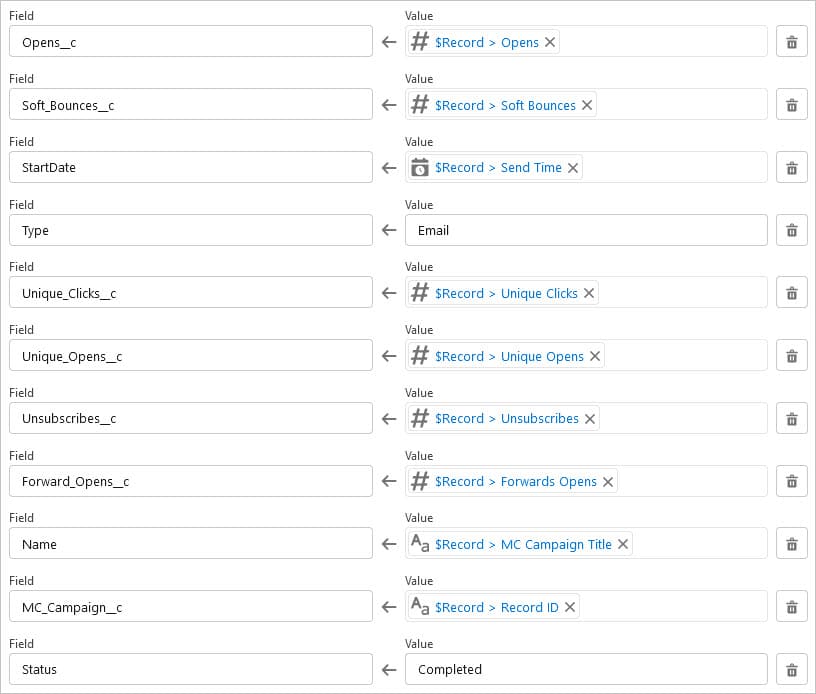
- Configure the Create Records element:
-
- How Many Records to Create = One
-
- How to Set the Record Fields: Use separate resources, and literal values
-
- Object = Campaign
-
- Set Field Values for the Campaign:
-
- Abuse_Reports__c = {!$Record.MC4SF__Abuse_Reports__c}
-
- Clicks__c = {!$Record.MC4SF__Clicks__c}
-
- Emails_Sent__c = {!$Record.MC4SF__Emails_Sent__c}
-
- EndDate = {!$Record.MC4SF__Send_Time__c}
-
- Forwards__c = {!$Record.MC4SF__Forwards__c}
-
- Hard_Bounces__c = {!$Record.MC4SF__Hard_Bounces__c}
-
- Opens__c = {!$Record.MC4SF__Opens__c}
-
- Soft_Bounces__c = {!$Record.MC4SF__Soft_Bounces__c}
-
- StartDate = {!$Record.MC4SF__Send_Time__c}
-
- Type = Email
-
- Unique_Clicks__c = {!$Record.MC4SF__Unique_Clicks__c}
-
- Unique_Opens__c = {!$Record.MC4SF__Unique_Opens__c}
-
- Unsubscribes__c = {!$Record.MC4SF__Unsubscribes__c}
-
- Forwards_Opens__c = {!$Record.MC4SF__Forwards_Opens__c}
-
- Name = {!$Record.Name}
-
- MC_Campaign__c = {!$Record.Id}
-
- Status = Completed
-
- Set Field Values for the Campaign:
-
- Configure the Create Records element:
If you are using Record Types on the Campaign object, please go to this article to see how you should use Custom Metadata Types to reference the Record Type Id, so you do not have to hard code it in the flow.
- Click + sign below the Yes path to add a new element
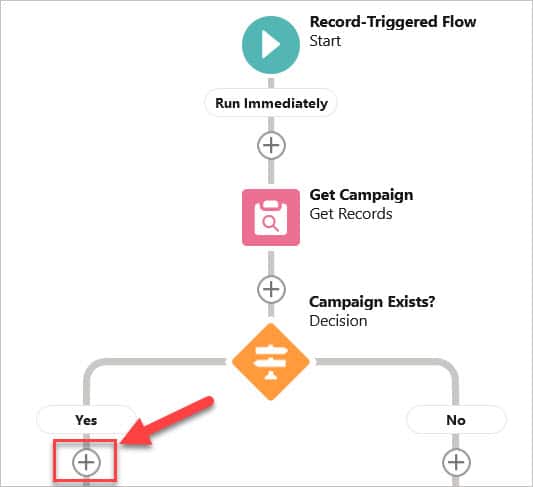
- Select Decision

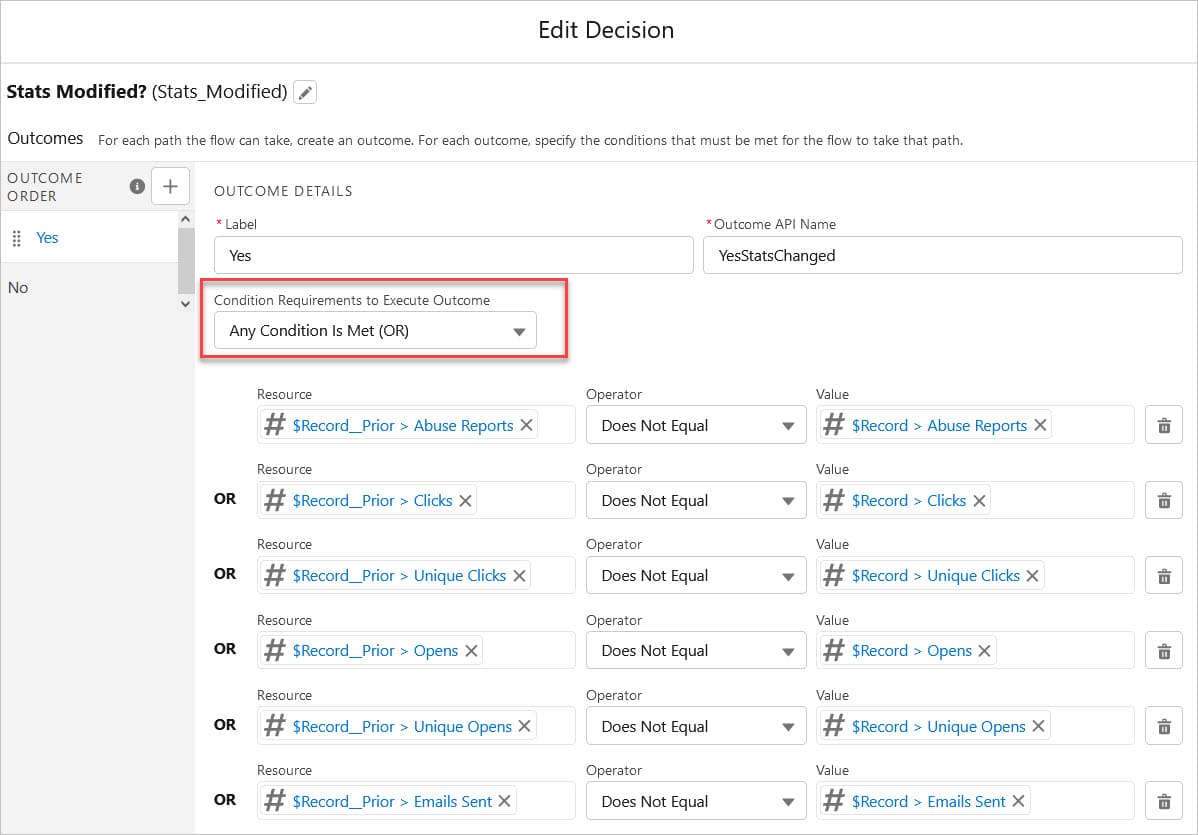
- Configure the Decision element:
- Name = Stats Modified?
- Configure Outcome:
- Label = Yes
- Condition Requirements to Execute Outcome = Any Condition is Met (OR)
- Add the following filter criteria:
- {!$Record__Prior.MC4SF__Abuse_Reports__c} Does Not Equal {!$Record.MC4SF__Abuse_Reports__c}
- {!$Record__Prior.MC4SF__Clicks__c} Does Not Equal {!$Record.MC4SF__Clicks__c}
- {!$Record__Prior.MC4SF__Unique_Clicks__c} Does Not Equal {!$Record.MC4SF__Unique_Clicks__c}
- {!$Record__Prior.MC4SF__Opens__c} Does Not Equal {!$Record.MC4SF__Opens__c}
- {!$Record__Prior.MC4SF__Unique_Opens__c} Does Not Equal {!$Record.MC4SF__Unique_Opens__c}
- {!$Record__Prior.MC4SF__Emails_Sent__c} Does Not Equal {!$Record.MC4SF__Emails_Sent__c}
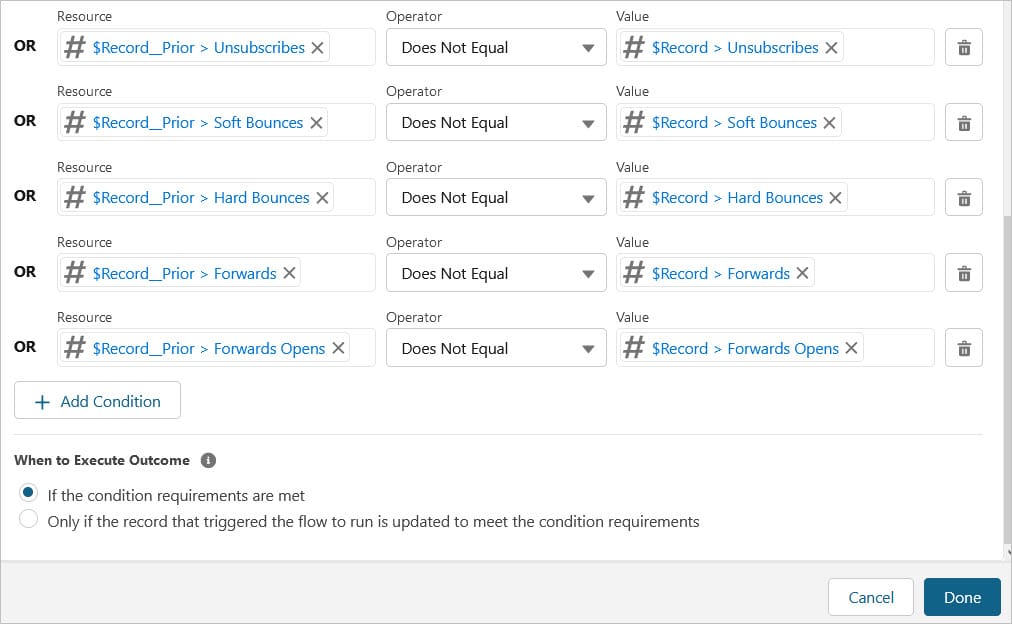
- {!$Record__Prior.MC4SF__Unsubscribes__c} Does Not Equal {!$Record.MC4SF__Unsubscribes__c}
- {!$Record__Prior.MC4SF__Soft_Bounces__c} Does Not Equal {!$Record.MC4SF__Soft_Bounces__c}
- {!$Record__Prior.MC4SF__Hard_Bounces__c} Does Not Equal {!$Record.MC4SF__Hard_Bounces__c}
- {!$Record__Prior.MC4SF__Forwards__c} Does Not Equal {!$Record.MC4SF__Forwards__c}
- {!$Record__Prior.MC4SF__Forwards_Opens__c} Does Not Equal {!$Record.MC4SF__Forwards_Opens__c}
- When to Execute Outcome = If the condition requirements are met
- Change the label of the Default Outcome to No
- Click + sign below the Yes path to add a new element
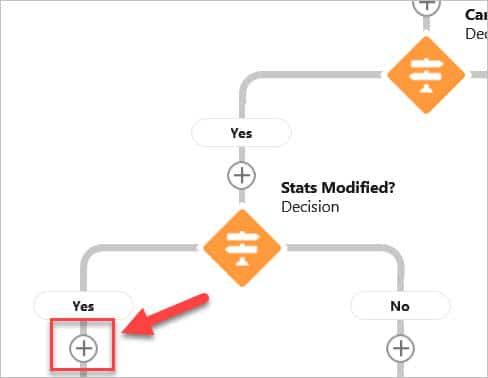
- Select Assignment
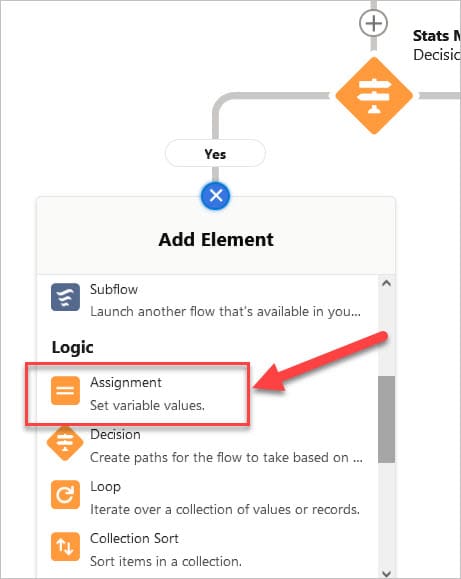
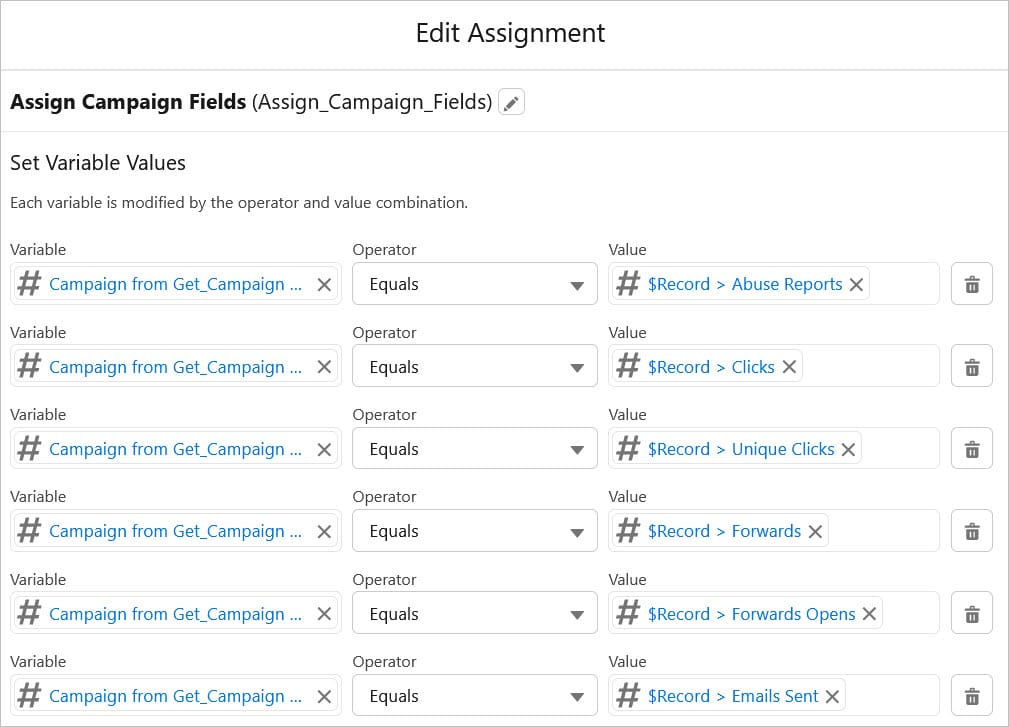
- Configure the Assignment element:
- Label = Assign Campaign Fields
- Set Variable Values:
- {!Get_Campaign.Abuse_Reports__c} Equals {!$Record.MC4SF__Abuse_Reports__c}
- {!Get_Campaign.Clicks__c} Equals {!$Record.MC4SF__Clicks__c}
- {!Get_Campaign.Unique_Clicks__c} Equals {!$Record.MC4SF__Unique_Clicks__c}
- {!Get_Campaign.Forwards__c} Equals {!$Record.MC4SF__Forwards__c}
- {!Get_Campaign.Forward_Opens__c} Equals {!$Record.MC4SF__Forwards_Opens__c}
- {!Get_Campaign.Emails_Sent__c} Equals {!$Record.MC4SF__Emails_Sent__c}
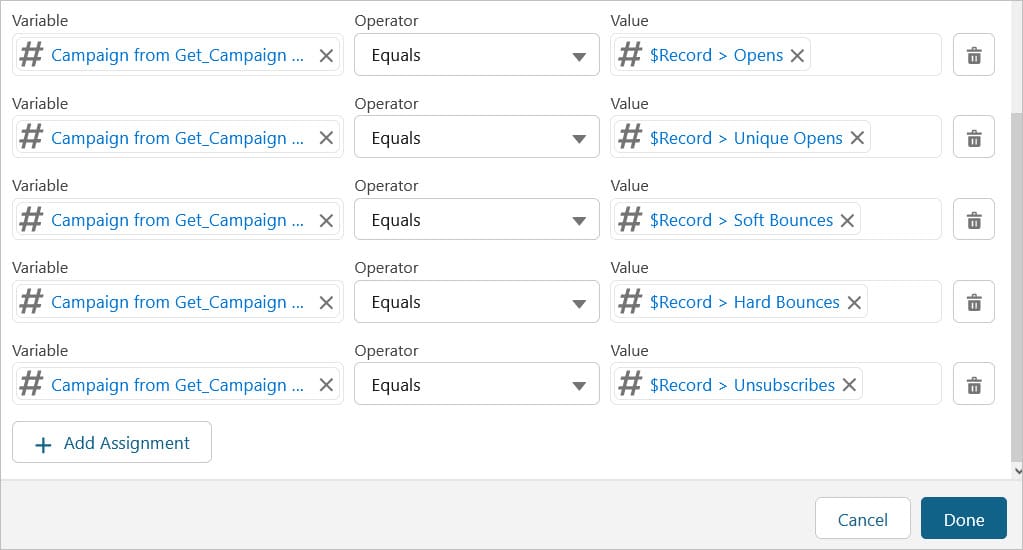
- {!Get_Campaign.Opens__c} Equals {!$Record.MC4SF__Opens__c}
- {!Get_Campaign.Unique_Opens__c} Equals {!$Record.MC4SF__Unique_Opens__c}
- {!Get_Campaign.Soft_Bounces__c} Equals {!$Record.MC4SF__Soft_Bounces__c}
- {!Get_Campaign.Hard_Bounces__c} Equals {!$Record.MC4SF__Hard_Bounces__c}
- {!Get_Campaign.Unsubscribes__c} Equals {!$Record.MC4SF__Unsubscribes__c}
- Click + sign below the Assign Campaign Fields assignment element
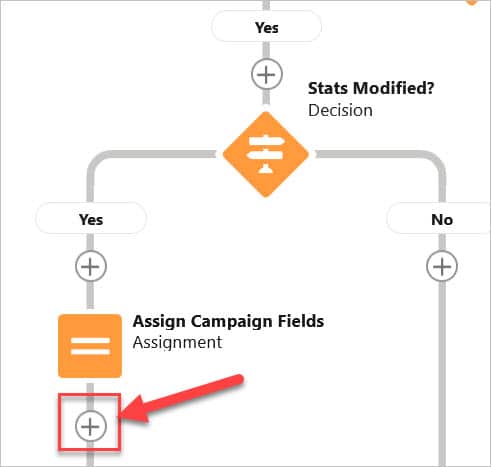
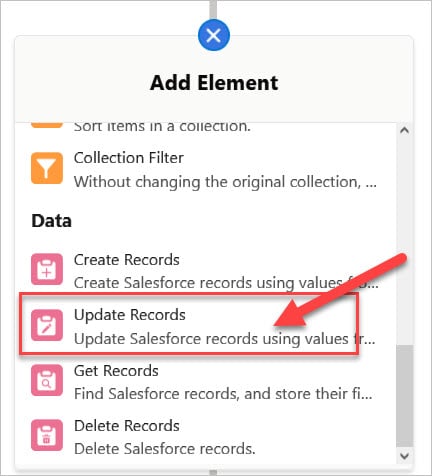
- Select Update Records
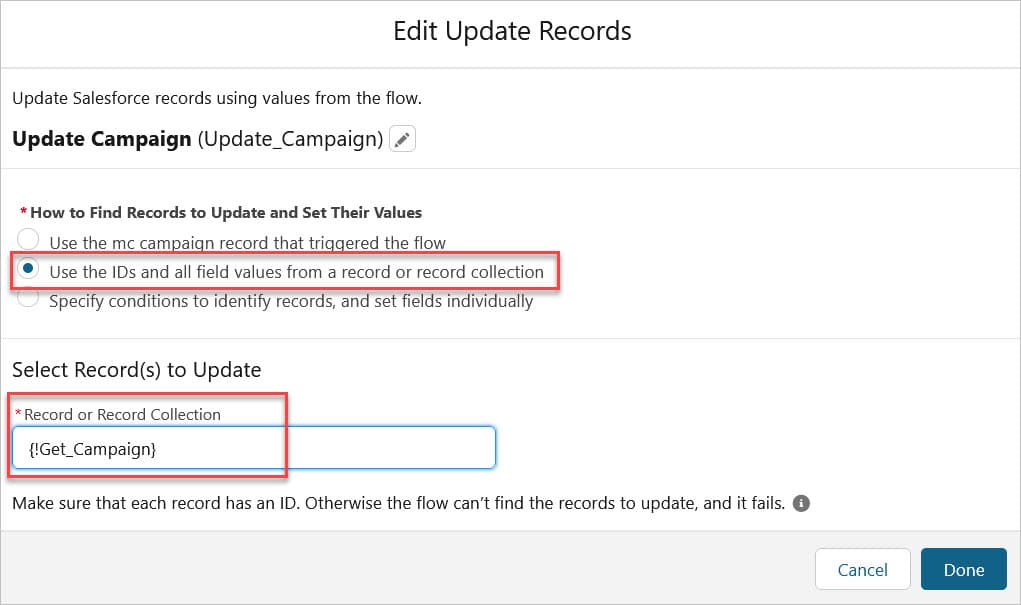
- Configure Update Records element:
- How to Find Records to Update and Set Their Values = Use the IDs and all field values from a record or record collection
- Record or Record Collection = {!Get_Campaign}
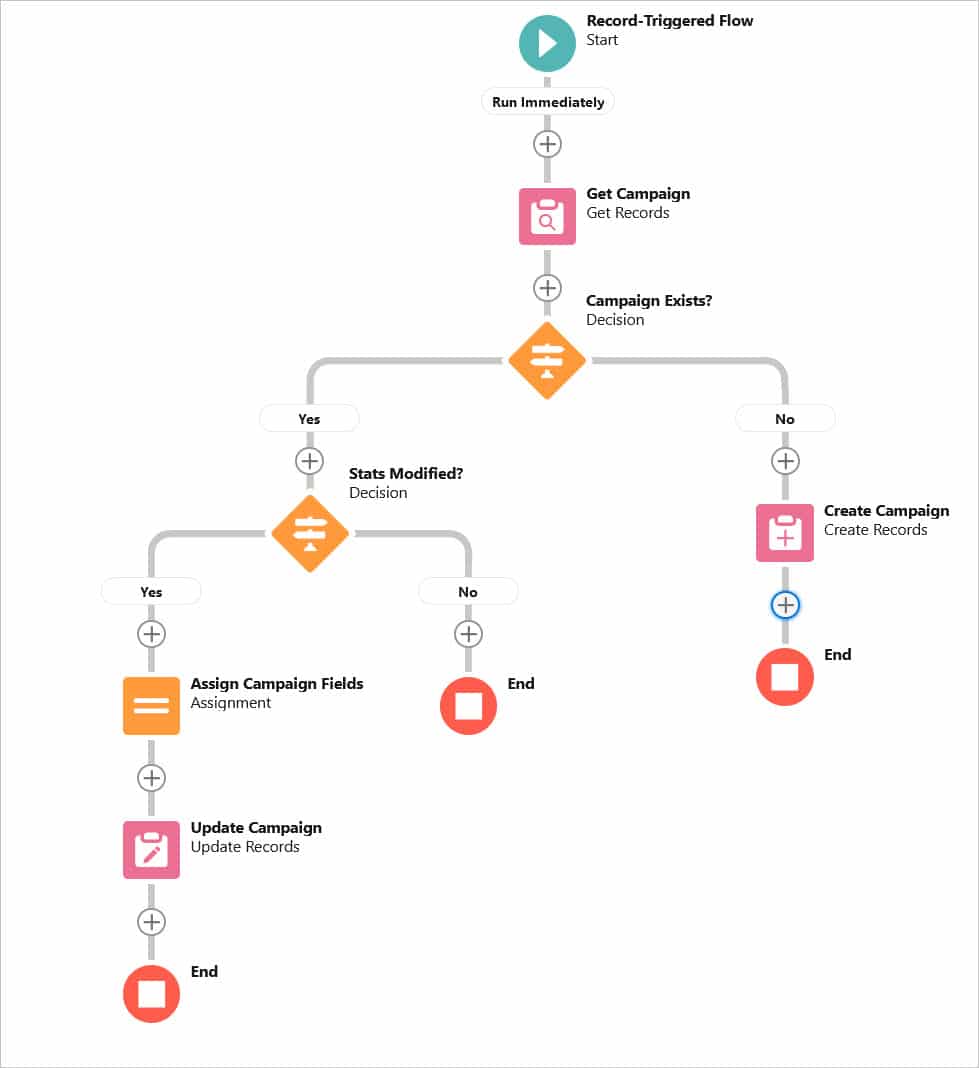
- Here is what your flow should look like so far:
- If you are going to complete Part 7: Mailchimp to Salesforce Integration - Create Campaign Members (this article shows you how to add the contacts as campaign members and update their status), follow these steps:
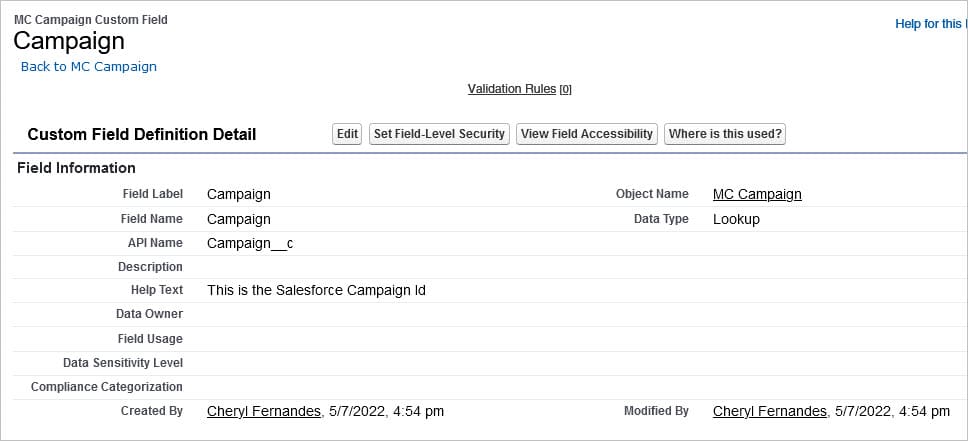
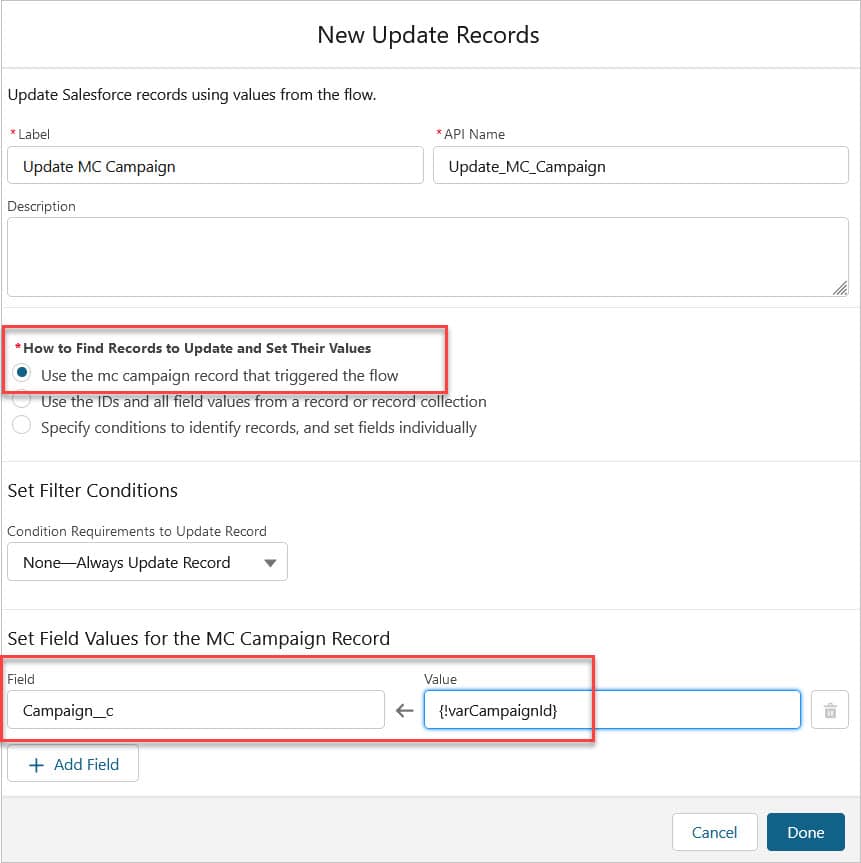
- Create a new field on the MC Campaign object called Campaign - this is a lookup to the Salesforce Campaign object. This is a helper field we use in the flow in Part 7.
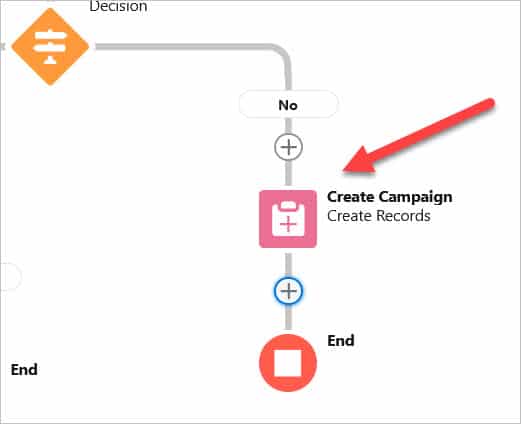
- Click the Create Campaign element
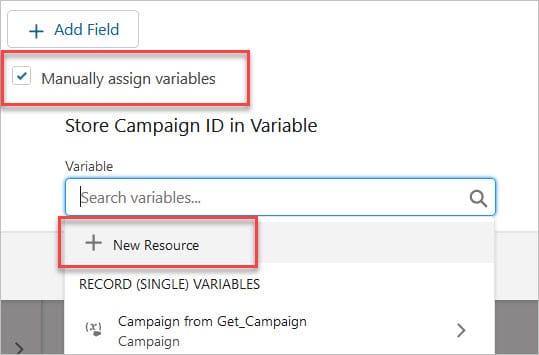
- Scroll down to the bottom & check the box: Manually assign variables
- Click New Resource
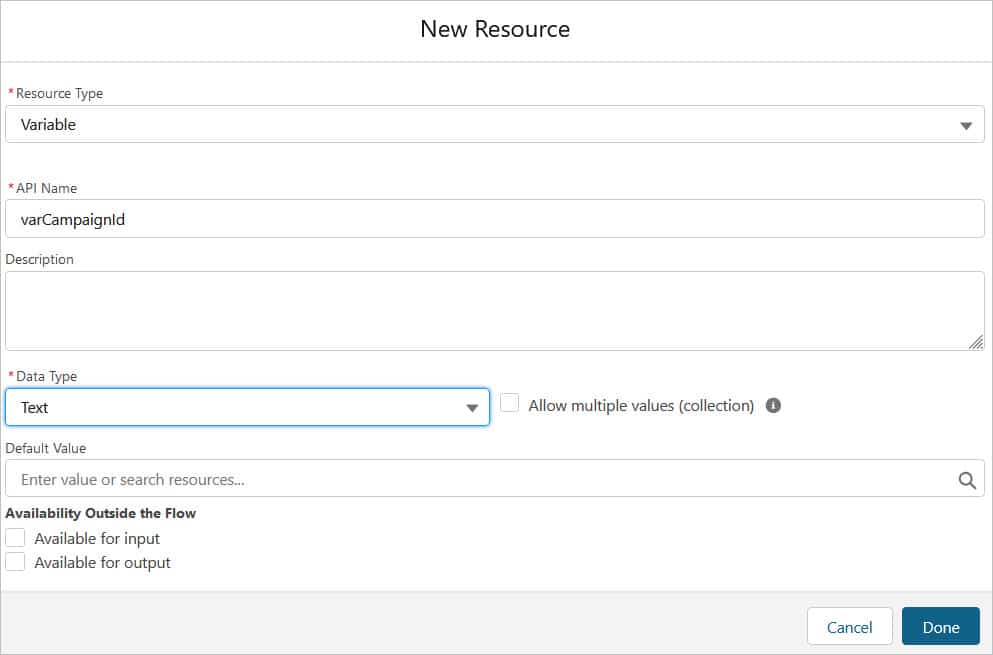
- Create a new variable called varCampaignId
- Data Type = Text
- Click the plus sign below the Create Campaign element
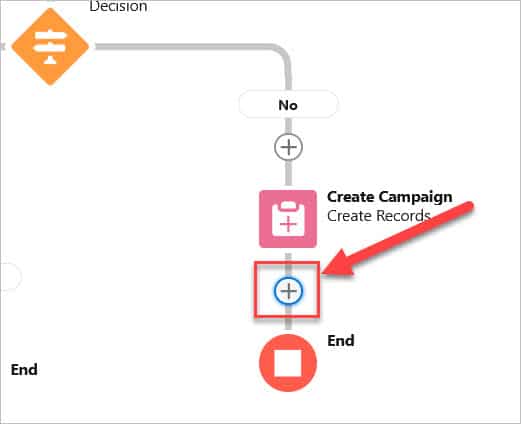
- Select Update Records

- Configure the Update Records element to have the following:
- Click Activate. You are now ready to start testing.
How to Test the Flow
There are two scenarios to test:
- Create Campaign in Mailchimp, send email and confirm a campaign is created in Salesforce.
- Start with a Salesforce Campaign that is related to a Mailchimp campaign and confirm stats are updated and duplicate campaign is not created.
If you followed the steps in Mailchimp to Salesforce Integration - Part 1 - you have a campaign record setup in Salesforce and Mailchimp. Go to this Campaign record in Salesforce and update the MC Campaign field to link the records.
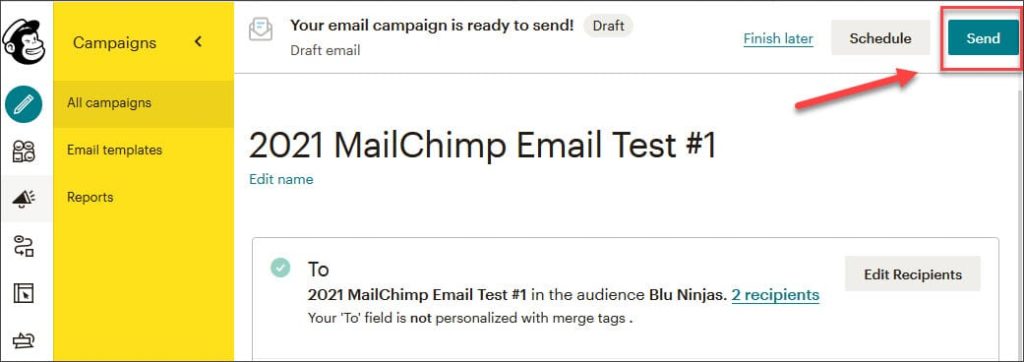
- Go to Campaign in Mailchimp and Click Send. Before sending, make sure you are a recipient in the campaign. Go to your email and open the test email and click one of the links in the email.
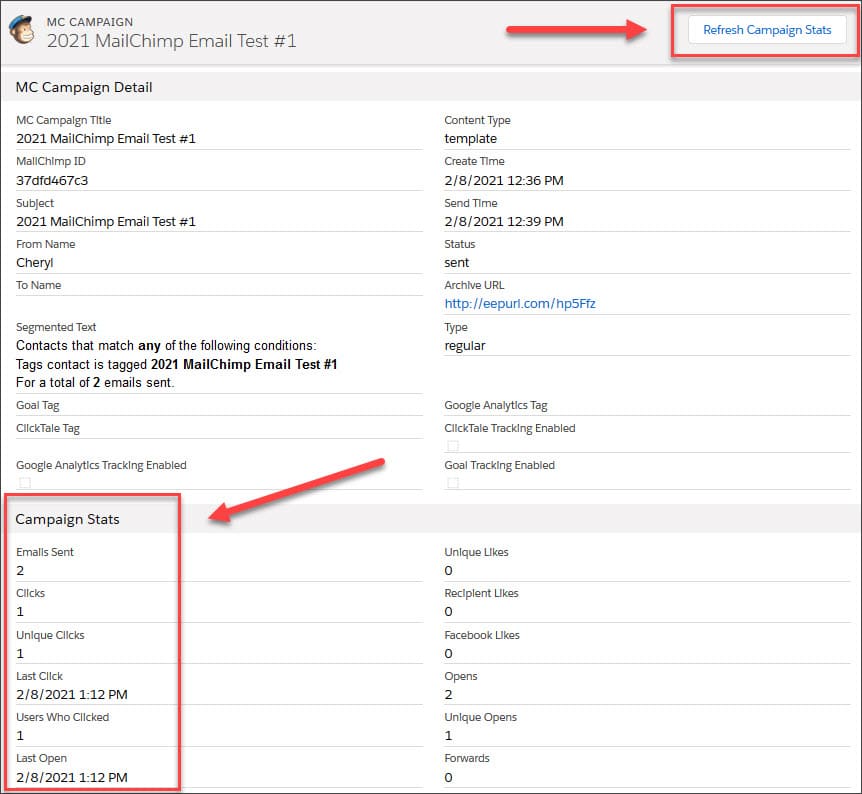
- Go to the MC Campaign record in Salesforce - you will find it in the MC Campaign tab. Click the Refresh Campaign Stats and confirm the stats updated on the page. Please note: Campaign stats will refresh automatically every hour for the first 72 hours after the email campaign launched. If you navigate back to this page after 72 hours, click the Refresh Campaign Stats button to see the latest info from Mailchimp.
For any questions, comments, concerns – let us know in the comment section below!
We would love to hear from you!


Hi there! This is great stuff. However it doesn’t seem like the links are working to the next part, adding leads to the campaign itself.
Hi Jacob,
Thank you! Yes, I know this page is down right now because we are working out a bug we ran into. We hope to have this page live soon. I will ping you when it is ready.
Hi Jacob,
We had to write apex in order to achieve adding campaign members to the campaign due to how the sync is running between Mailchimp and Salesforce. We have updated the article and made it live. Let us know how it goes. Thank you for your patience while we worked out the bugs.
Cheryl, I noticed it shows setting values for forward and forward opens but it doesn’t show creating it (or I overlooked it). Thanks.
Hi Mimi, Good catch here! I have added those two fields: Forwards and Forward Opens to the list of fields that need to be created on the Campaign. Thank you for letting me know the article was missing these!
Hi Cheryl, useful stuff here. I noticed a typo. Forward Opens should be Forwards Opens. Thanks
Thank you! The typo has been fixed!