Update County Based on Postal Code Using Flow
Business Problem
Some sales teams assign territories based on county in the United States and this requires someone to update the county in Salesforce in order to assign the Lead or Account to the appropriate person. Automating the update to the County based on the Postal Code of an address will eliminate the need for someone to manually update this information.
We have built a free AppExchange solution that will automate this entire process for Leads, Contacts and Accounts. This App Exchange package will lookup the county based on the postal code of the following:
- Leads - the standard Zip Code field
- Accounts - the standard Billing Zip Code field
- Contacts - the standard Mailing Zip Code field
The package contains the following components
- Postal Code County Mapping (Custom Object) - this object holds the relationship between the County, State and Postal Code; each record is a single postal code.
- Postal Code County Mapping (Custom Tab)
- Postal Code County Mapping (Page Layout)
- City - (Custom Field on Postal Code County Mapping Object) - this is the city of the postal code record
- State - (Custom Field on Postal Code County Mapping Object) - this is the state of the postal code record
- Postal Code - (Custom Field on Postal Code County Mapping Object) - stores the postal code data for each record
- County - (Custom Field on Postal Code County Mapping Object) - this is the county of the postal code record
- County - (Custom Field on Lead Object)
- Billing County - (Custom Field on Account Object)
- Mailing County - (Custom Field on Contact Object)
- Lead | Update County from Postal Code (Record-Triggered Flow)
- Account | Update County from Postal Code (Record-Triggered Flow)
- Contact | Update County from Postal Code (Record-Triggered Flow)
- Lead | Account | Contact - Update County from Postal code (Autolaunched Flow)
Or continue on for a short tutorial below.
Note: The video tutorial goes way more in depth.
How to Configure the App
- Install the AppExchange package into a sandbox environment. Here is the link to install in production.
- Go to Setup | Flows and make sure the following flows are active:
- Lead | Account | Contact - Update County from Postal code
- Account | Update County from Postal Code
- Contact | Update County from Postal Code
- Lead | Update County from Postal Code
- Update field level security for the fields for the necessary profiles.
- Go to Leads | Page Layouts and add the County field to your Lead page layouts.
- Go to Accounts | Page Layouts and add the County field to your Account page layouts.
- Go to Contacts | Page Layouts and add the County field to your Account page layouts.
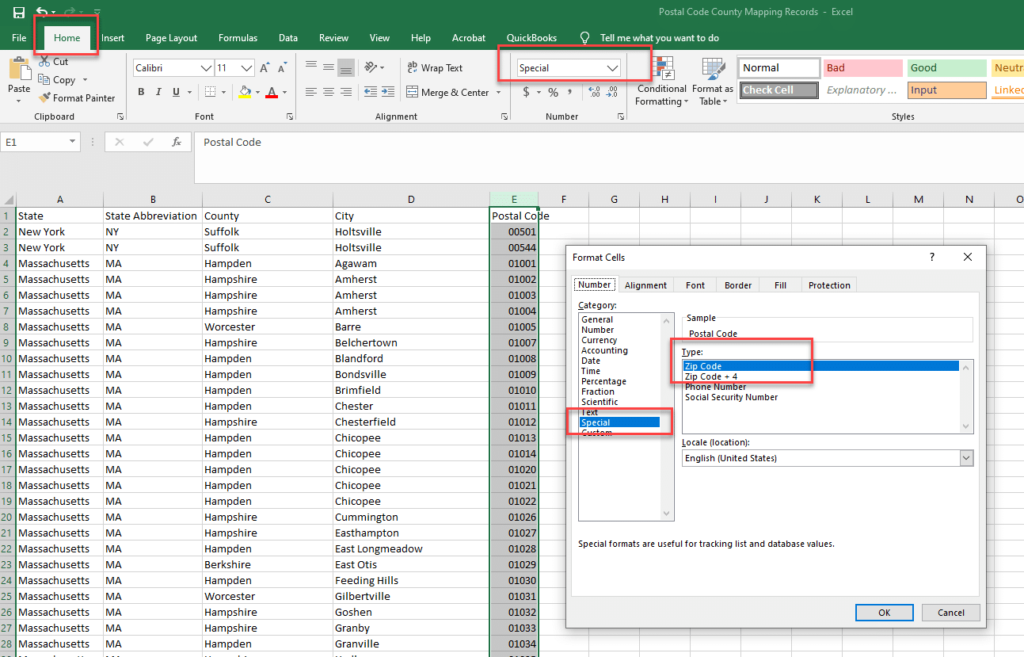
- Use Data Loader to import the records needed for the Postal Code County Mapping object in this file. We cannot guarantee this is the most up to date version of the data, there may be some discrepancies for some zip codes if updates are made. You are responsible for validating the data in the file.
- If you open the CSV file to review it, make sure to reapply the custom format to the postal code column, so the leading zeroes are added. We recommend using the Special format called Zip Code.
That's it, you are ready to test out the app!
Please Note
If you have other record triggered flows in your org for these objects, you may just want to copy these flows into your existing ones. Salesforce recommends only having one active record triggered flow per object if possible.
How it Works
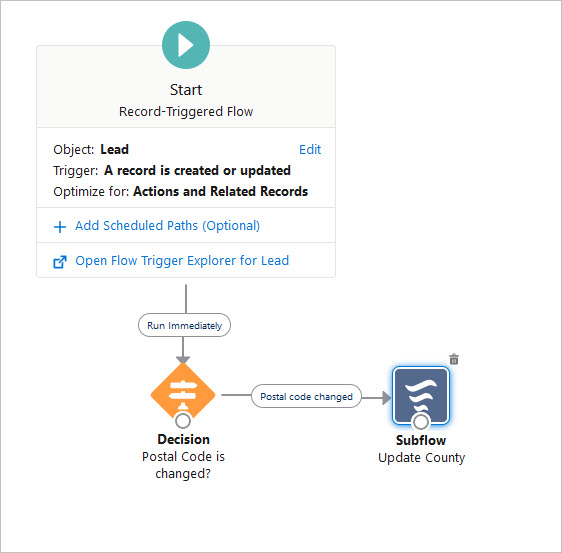
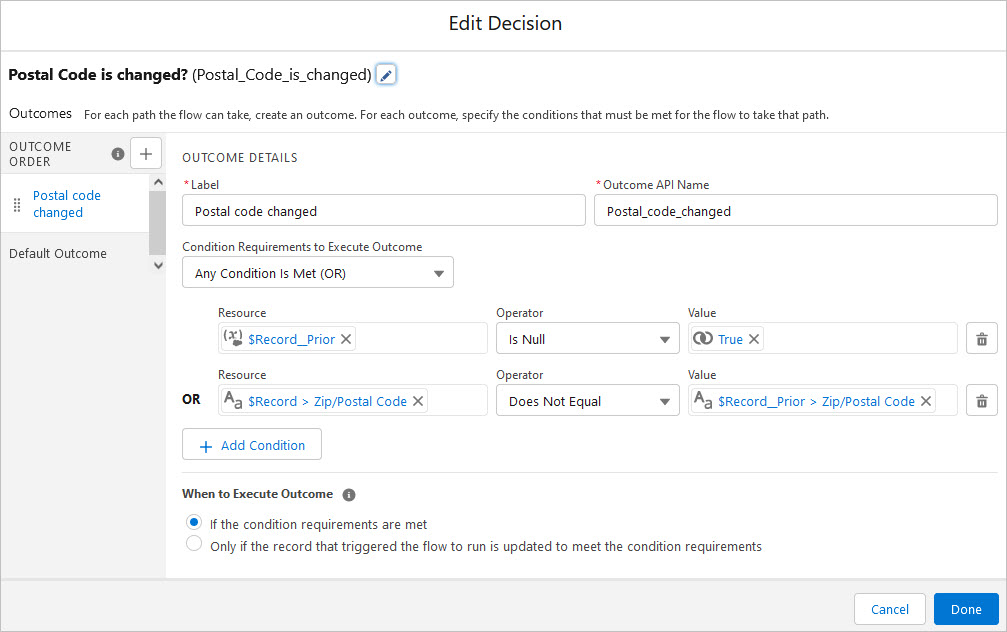
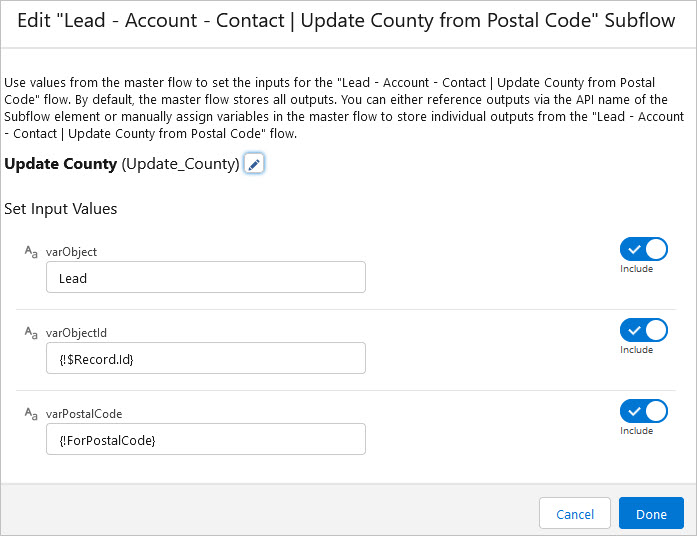
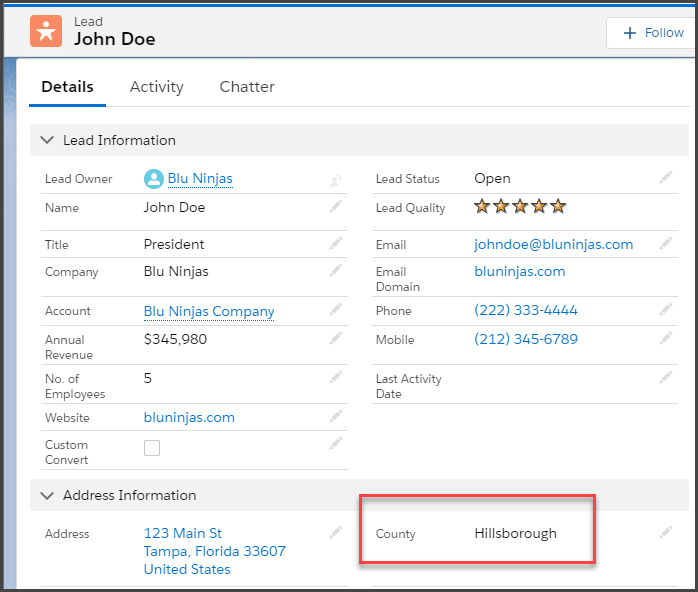
- The flow Lead | Update County from Postal Code is triggered whenever you create a Lead with a value in the Zip Code field or if the value in the Zip Code field is changed. It invokes the autolaunched flow called Lead - Account - Contact - Update County from Postal code. The flow passes three variables into the flow:
- varObject = "Lead" - this tells the flow which path to choose since we are using the same flow for all three objects
- varObjectId = the Id of the Lead
- ForPostalCode = the first 5 characters of value in the Zip Code field on the Lead
The Account and Contact processes work exactly the same way. Looking forward to hearing any suggestions you may have and let us know if this helped you out!
How to Trigger an Update to Existing Records
Now you have the automation in place and it is working for all newly created or edited records, but what about the rest of your database? Here are the steps on how to easily trigger an update to all existing Lead records quickly:
- Take an export using Data Loader of all of the Leads with a value in the Zip Code field.
- Open the export and add a column called Zip Code Blank
- Make sure the settings in Data Loader are set to Insert null values = true.
- Run an update to the Leads to remove the value from the Zip Code by mapping your null zip code column to the zip code field on the Lead.
- Run another update to the Leads to put the value back in the Zip Code field.
Voila, this should have triggered the flow to update the Counties on all Leads.
For any questions, comments, concerns – let us know in the comment section below!
We would love to hear from you!
I installed the package and followed instructions precisely except for one step. I did not use dataloader for uploading the mapping object file. I have a new Macbook M1 Pro and encountering issues installing dataloader. So i created the object via spreadsheet upload.
Upon reaching out to bluninjas I was advised to check if the data types of the fields matched and ensure the records were uploaded with complete information. After review i noticed the following fields do not have matching data types:
Postal Code & State:
Postal Code County Mapping: Postal Code is Text(5) & State is Picklist
Postal-Code-County-Mapping-Records: Postal Code is Text(255) & State is Text(255)
I am going to change these two fields to have matching data types and provide an update.
Update: I changed both Postal Code field data types to match Text(255) AND State fields to be Picklist.
Still not working. I created a new lead, edited a current lead in the system and nothing is getting the county field to fill in.
Hi Jason,
Thank you for reaching out. Just wanted to put the resolution here for others. Since you used the custom object wizard, it created a new object from your data. This new object is not referenced in the flow that is doing the automated update to the County. If you import the data to the custom object that came with the package, it should work. If data loader is not an option for you, you can also load data using workbench: https://workbench.developerforce.com/login.php or the data import wizard.
I’d like to retract my last comment.
I would like to say, watch the VIDEO, it’s awesome and everything worked when I followed that.
I tried just reading instructions but there was not enough, that is why I failed.
So far, so good here.
Thanks
Will this work for a Person Account? Struggling to get it to work.
Hi Jan,
Interesting question! I have no idea, we have not tested this flow with Person Accounts at all. I will have to test this out in a developer org. What specific issues are you running into?